How to build and view the site/area/work-center/machine hierarchy
Wiki: Setup concepts, The ISA-95 hierarchy
When to use this
This is where you model your plant, before configuring machines or checking a rollup, or on day one with a brand-new, empty tenant and no device to hand yet. You build the structure first. The device lands into it later (config-first onboarding).
Steps
- Click Plant Structure under Setup at the bottom of the sidebar (
/hierarchy), this is the plant-modeling tree. It’s a different screen from Facility Map’s KPI lens (opened from Home’s “Plant status” tile or ⌘K search), the OEE rollup that reads this same tree instead of editing it.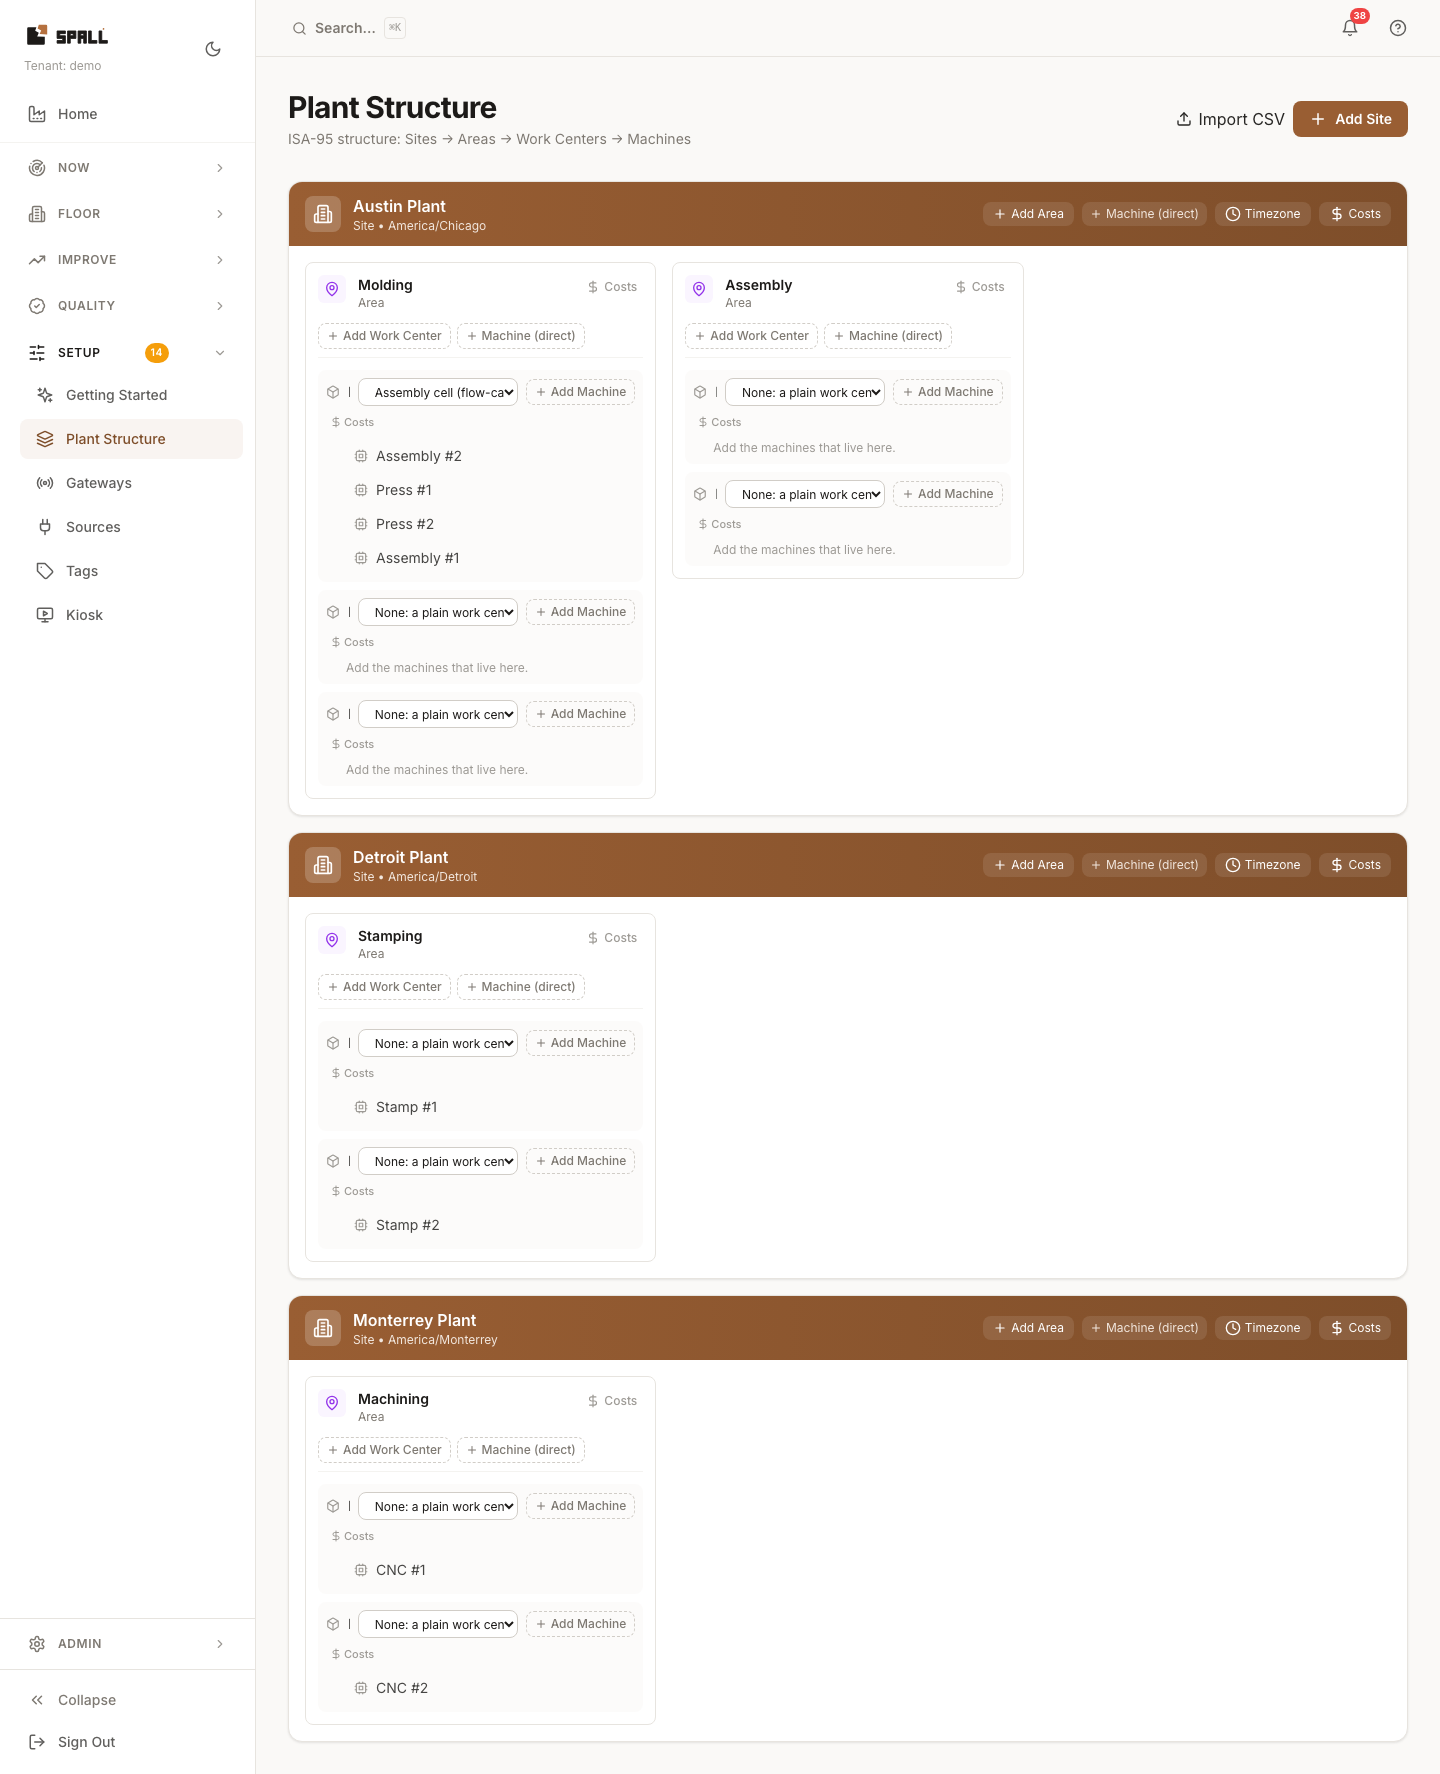
- Empty tenant? Click Create First Site (or + Add Site in the header). Type a name, the id is
always derived from it (shown as a read-only hint, e.g. “will be created as
austin-plant”) and is never typed by hand, so it can’t be left blank. - Every row in the tree gets an “Add …” button for its child level, Site → + Add Area, Area → + Add Work Center, Work Center → + Add Machine, using the same small modal each time (name in, derived id shown, create). An empty level’s own empty state names the next step and why (“Add an area, areas group your lines,” “Add the machines that live here.”) instead of leaving you looking at a blank card. Machines ARE your assets, there’s no separate assets screen. You add and edit them right here.
- You don’t have to go all the way to Work Center before adding a machine, Site and Area both also offer a labeled “Machine (direct)” button. It’s a real exception (a two-machine shop may never want areas), not the default: the button is visually secondary next to “Add Area”/“Add Work Center,” and the machine still shows up nested wherever you attached it.
- Give a work center a designation, “None (a plain work center),” “Assembly cell (flow-capable),” or “Line (flow-capable)”, to mark it as a flow-tracked cell/line. A flow-capable work center is what shows up as a designated cell on Facility Map with live rate/state edges, and is what you click through to from there to open its own monitor canvas.
- Click Costs on any node to set its ISA-level $ rates (downtime $/hour, scrap $/unit, energy $/kWh) inline, or set them plant-wide in one place via Rates & Costing instead.
- Click Timezone on a site to set its own local time zone (grouped by region, pick the nearest city). Once set, anyone viewing that site’s screens sees its own clock by default, with a one-click toggle in the header to switch back to their own time, a supervisor in another city sees the plant’s real shift times, not their own browser’s. Leave it unset and everyone just sees their own local time, same as before.
- Newly created nodes briefly highlight (a ring around the row) and a toast confirms the create, so success is never silent, and neither is failure: a duplicate name or a network error keeps the modal open with the reason shown inline instead of just closing.
- Click through to a machine to reach its Node page, the canonical place for its measurements, KPI targets, performance, and a Notes tab (the same logbook notes as Shift Handoff and the Logbook, scoped to this node). From there, Add child in the header reuses the exact same modal (useful once you’re managing the tree from a specific node instead of the top-level Setup page), and Move lets you re-parent a node later (e.g. a machine attached at site level, moved under a work center once one exists). A newly created machine also offers Attach signals, pulling in tags that are already connected somewhere else instead of running the connect wizard again, see Already have the tags? for the full flow.
Notes
- Reads/writes go through the level-agnostic
/nodesendpoints (GET /nodes/tree,POST /nodes/,PATCH /nodes/{id}), the one API surface that understands every level, including machines, so what you see here always matches Facility Map and Node Detail’s rollups. - Level integrity is enforced server-side: an area’s parent must be a site, a work center’s parent must be an area, no skipping those two layers, since work centers are what routings, preferred-routing rates, and flow designations attach to. The one exception is a machine, which may nest directly under a site or area (the “direct” buttons above) as well as under a work center.
- The Connect a machine wizard’s parent picker uses the same create logic when you mint a work center/area inline mid-wizard, see How to manage gateways: the gateway home.
- Plant Structure is the owning surface for adding and editing machines.